Wednesday, August 21, 2019

Spinach Tart with Pasta Dough Crust

Spinach Tart with Pasta Dough Crust

I won't go into the reason that spinach pies are so special for our family.  I've written about this in another 'Rustic Spinach Pie' blog post.  

However, the variations on these pies are limitless.....and it seems that each Mediterranean and/or Middle Eastern country has their own version.  I guess the reason for this is that spinach is abundant in these climates.  Our peasant ancestors, or anyone with a crop of spinach a hundred or more years ago, figured out that it's a great stuffing for pasta, pies, meats, etc.  Since spinach is prolific, each family probably concocted recipes to get a good dose of the vegetable into family meals each day.  Spinach pies are one of the fan favorites that survived.  

Today, bulk spinach purchases from Costco or big supermarkets finds its way into smoothies.  A few months ago, I might have looked at the 2 pound bag of baby spinach and considered the many smoothie options I could create for the week.  It's a simple, fast way to consume healthy veggies.  However, this is where the traditions start to fade.  When you can whip up a smoothie in 2 minutes, you might find that it's a good excuse to avoid more time consuming ways to incorporate a few pounds of greens into other tasty options.   I've thrown in the towel on spinach smoothies for a while.  I'm preferring to test spinach pie recipes.  My previous 'Rustic Spinach Pie' blog post starts with a more complicated puff pastry and the filling is a little more complex as well.  The recipe that follows is an easier, faster version for a really tasty spinach pie.  It starts with a pasta dough that you roll in your pasta maker.  You then fill it with a very basic filling of spinach, onions, grated cheese....and then bake it.   It's still a little time consuming to make the pasta dough but if you're proficient at making this dough (and it takes only a few times working with pasta dough to get pretty proficient), you can whip it up in under an hour, including a 30 minute pasta resting period.  It's only a little more difficult than making a box cake if you have the right equipment.  I have the KitchenAid pasta attachment and wouldn't do it any other way (and trust me, I'm not paid for saying that).  This thing just pushes out pasta with the push of a button and a little guidance through the roller.  I also have a manual pasta maker.  It's good for rolling super thin sheets (for my Sfogliatelle blog recipe post)..... but takes more muscle and time.  My manual machine doesn't seem to like to stay put.  I've clamped it down on counters and came close to nailing it down to a board.  However, since I've purchased the KitchenAid, I've given up on being hostile to my manual machine. It serves a limited purpose so I snarl at it but I keep it.    

The recipe that follows is compliments of a 900 page Italian cookbook (La Cucina) that I recently acquired to go with my other massive non-translated Italian cookbook.  La Cucina has been translated to English so it saves one of the steps in the process.  Many recipes are similar but I'm now finding myself comparing the two books for similarities.  La Cucina is hailed as the most complete and authentic Italian cookbook that was assembled by the Italian Academy of Cuisine.  About 60 years ago, the Italian Academy of Cuisine's thousands of members invaded the Italian countryside gathering regional recipes from the grandmas and local chefs so that the recipes would be preserved for future generations.  

A forewarning to anyone who wants to buy this book (available on Amazon).  It's not for beginner cooks.  Many of the 2000 recipes leave something to the imagination...and there are no photos for any of the recipes.  However, if you've cooked Italian food for a while and if you understand some of the nuances that you might have seen your aunts, uncles, grandmothers incorporate into the cooking, you can follow these recipes.  So, I'm cooking my way through two Italian cookbooks now (one translated and the other not).  The only big challenge is narrowing down the selection for the week.   In this new book, because it has no pictures, I have no idea how something is 'supposed' to look when it's done.  However, part of the experiment is to do my best to interpret old recipes.   If they taste good, I blog about it and post with photos for all the other cooks who might want a reference to see how it might look when it's done!

I've already cooked a few things from this new book....and they are remarkably good.  I'll take pictures next time so that they are blog worthy.  The thing I've noticed is that some of the cooking that my parents and aunts/uncles did seems modernized from some of these recipes.   In one generation, you can see that recipes are adapted.   Going back to the roots of some of these recipes is a whole new experience.  For example, I love stuffed peppers.  My dad, whose family is from Naples area, would take a pepper, cut off the top, stuff it with a bread stuffing and then bake them in a covered water bath.   This softened the peppers and cooked the stuffing.  They were delicious.   This recipe book has a version from Naples that starts with fire roasting the peppers, skinning them and then stuffing them.  The fire roasting takes a lot more time because you have to peel these guys after roasting them.   However, since the peppers are already cooked, you can avoid the water bath and just cook everything for a short period under direct heat in the oven where it gets that crunchy stuffing top hat.  Either way, they are delicious but the flavors of the fire roasted peppers are definitely worth the extra effort once in a while.  

These recipes aren't intended for everyday cooking.  We all recognize that the days where meal prep was an all day event over wood fired stoves are gone.  Still.....every once in a while, when you have a few hours of down time, it's nice to focus on something special.  These recipes are intended to be those special additions to meals...even when the ingredients are super simple.  

Ingredients (for a tart that is about 5 inches wide and 15 inches long)

Pasta Dough:
1 1/2 cups of all purpose flour
1/2 cup of water
2 Tbs of olive oil
1 tsp of lard...or just use a little more olive oil
pinch of salt (about 1/8-1/4 teaspoon)

Filling:
2-3 pounds of spinach or swiss chard (I used baby spinach)
4 Tbs of unsalted butter
2 Tbs of lard (or more butter if you don't want use lard)
1 medium onion diced
1 garlic clove minced
2/3 cup grated Parmesan cheese
2 Tbs olive oil
2 oz of diced pancetta

Make the Pasta:
  1. Put the flour in a bowl, create a well and add the water, olive oil, lard and pinch of salt to the center of the well.  Start to stir the wet mixture with a fork and gradually mix in the flour from the sides. 
     
  2. Time to get your hands into it.  When you've got most of the flour dampened, you can just go at it with your hands.  Start to knead the mixture by pushing your palm into the dough, turning it and folding it over. You'll be picking up the stray flour as you start this process.  You only want to add enough of the flour until you can stick your index finger into the dough and it doesn't stick when you pull it out.  
  3. Once you've add most of the flour and your finger isn't pulling anything out when you do the poke test, you can throw the remainder flour away.....(there might be a tablespoon or two left but shouldn't be more than that.   You now continue to knead it for 10 minutes (it really is best to go for the full 10 minutes so don't cheat on this).
      
  4. Wrap the dough in plastic and set it aside (not refrigerated) for 30 minutes to let it rest.  
Make the Filling:
  1. Put spinach in a large pot with about 1 cup of water and cover.  Steam it until it's wilted (don't overcook).  Some of the leaves might still look a little raw but if you turn off the heat when most of them have wilted, the rest will wilt.  You don't want mushy spinach.  Drain it and when it's cool enough to handle, squeeze it dry and put between paper towels to get more moisture out of it.  
  2. Chop the spinach, onions, garlic
  3. Melt butter and lard in a large pan, cook diced onions until soft and then add the chopped spinach and garlic.  Cook for another 5 minutes and then let it cool.  
  4. Mixed the cooled spinach mixture with the olive oil, grated cheese and salt/pepper to taste
Assemble the Tart:
  1. Preheat oven to 350 degrees
  2. Unwrap the dough, cut it in half and run the first piece of  dough through a pasta machine at the widest level #1.  Fold it in half and run it through again.  Refold and do this one more time for a total of 3 times.
  3. Run the dough (without folding it) through levels #2, #3, #4 and #5 only once.   The sheet should be a uniform width when you remove it.  It will be the width of the pasta machine.  
  4. Lay the dough out on a parchment covered cookie sheet and spoon the spinach filling on the top leaving about 1 inch on each side of the pasta sheet.  
  5. Roll the second piece of dough the same way as you did the first piece and lay it over the top of the spinach.  Press the edges to seal, cut off the excess dough with a pasta crimping tool or knife.  Sprinkle the uncooked diced pancetta on top of the tart.   
  6. Bake for 45-60 minutes until it's nicely browned.  Cut and serve warm.
  7. You can make individual tarts instead of one long tart by cutting the pasta sheets into squares or circles and then filling and  covering with a second piece of pasta dough.  They can be frozen at this point and then thawed in the refrigerator for a few hours before cooking.  

The pasta dough gives this tart dough a cracker like texture.  It's not only delicious but really easy to handle...especially if they are individual tarts.  They don't get soggy like some bread or pie crust pastries.  I actually cooked some of the excess pieces of dough that I had trimmed off the tart.  I sprinkled them with a a little salt and pepper.  They took less time to cook (maybe 25 minutes) and were gobbled up in seconds.  The dough is really versatile.  You can cut it into strips, twist and make yummy breadsticks or any number of interesting crisp crackers.  I'll be experimenting with this dough.  I'm finding so many great reasons to use my pasta machine!!

Enjoy this wonderful recipe.  I'm making it for the second time in less than a week because it was that good and pretty simple......bring on those 2 pound bags of spinach!

Buona Mangiata!


Thursday, August 8, 2019

Hard Torrone- Testa Dura (Hard Head) to compliment Hard Torrone

Hard Torrone- Testa Dura (hard head) to compliment Hard Torrone!!

If you've read my post on the Torrone Tart, you already know that I've tried to make Torrone Candy in the past.  In one case, I used careful 'Bain Marie' slow boiling methods and wanted to shoot myself because nothing ever got to the right temp.  This yielded a tasty lava flow that never set up.  In another attempt, everything required hand-mixing for 2 hours...you need friends for this...and wine.  It didn't work because I got impatient and gave up at about 1 hour so I had another sticky gooey mess on my hands.

I had sworn off making this candy permanently....never ever again...and would have been happy with that decision until recently.    After making that Torrone Tart cake in my blog (which is awesomely good), I found myself really not wanting to concede defeat on the candy.  I wanted a hard piece of Torrone and it's not something you just pick up at the corner store in Nashville.  Although I could order it on Amazon, the good stuff from Italy costs about $25 for less than a pound and there was no guarantee that it would be hard...just that soft smushy version.  Sometimes, if I convince myself that I don't want to spend the money on something that isn't good for me, I can avoid it.  Unfortunately, more often than not, I explore ways to make the same thing for a fraction the price.  This eliminates one barrier and then any will power to avoid sweets for diet purposes disintegrates.  It's a curse and a blessing to be Italian.  If you like to cook and also like to eat, you need to somehow equalize the calories going in with the calories going out.  Plus, you need to at least pretend that you're not consuming the wrong kinds of calories all the time.  I prefer to think I have enough salad days to balance my robust cooking days.  But even if I eat like a rabbit all week, I still need to exercise these days.  So....now I just swim more laps and hit the yoga mat for a little longer each day so that I can continue to experiment with wonderful recipes that are disappearing from traditions.

My dad often told me that I was one of the most stubborn people he ever knew......but he also realized that I mimicked him so he always said it with a smile on his face and usually prefaced it with "Testa dura".....or 'hard head' in English.  I don't think I ever saw him give up on any task.  He could fix just about anything and was a master craftsman in the tile, terrazzo and marble trade.  His version of success could sometimes be comical.  When it came to fixing things like toys, which would get busted up regularly with 5 kids, he would eventually get them to work but they wouldn't be pretty.  My brother still has a mechanical wind up toy that is put together with black electrician's tape and odds and ends in my dad's workshop.  It was so ugly, that my brother kept it.  He also fixed a favorite stuffed animal monkey that was leaking stuffing out of the side of his head after losing an ear in a tug of war.   Dad got white medical tape and wrapped the monkey's head like a wounded warrior.  His perfectionism for some things was tempered with a good dose of  being practical for others.  He knew that those toys, or others, would be back on his workbench routinely so once he found a temporary solution, it was good enough. 

With stubbornness as a backdrop to this story, I decided to prowl in my pantry to see if I had what it would take to try making Torrone again.  I had honey.  It was far from good quality...which really makes a difference according to the pros.  A nice mild light colored clover honey would be much better.  I had a relatively cheap non-clover version from Costco that was very dark.  They sell them as a 3 pack in those plastic bear bottles.  It's good enough for adding to salad dressings or for a few tablespoons here and there but not something that you find yourself going to for a honey fix....and certainly inferior in a candy that features honey.  Nevertheless, I justified using it on this project to see if I could get the technique correct.  I also had the edible paper.  You buy these papers in 100 sheet bulk so I had about 90 sheets left and was surprised that I had only used 10 sheets until I realized how much candy you can produce with 10 sheets.  Fortunately, potato paper doesn't go bad and was just as dry as it was when I packed it away.   I always have almonds, at least 3-5 pounds in my freezer.  Once I confirmed I had the ingredients, I needed to see if I could actually find a recipe. I searched and researched methods and ingredients.  Almost every single practical home recipe is for a soft version...on the verge of what I would call a flop.  Other versions that claimed to get hard had no honey...in a honey nougat candy!  The tried and true Italian commercial versions required professional kitchens and offered no guidance on the quantities for the recipe.  Like a good detective, I just kept looking into details and ultimately hit on a video that was produced in a large commercial kitchen.  The recipe made 70 pounds of Torrone at a time.  It looked promising so I did some math and combined a few techniques to see if I could get this candy to cooperate in a home kitchen.   I took the recipe down to a more realistic 7 pounds of product.  In the end, 7 pounds fills up an 11 x 14 pan so it's not a completely decadent amount of candy by my standards.  It's just concrete level heavy so a small volume weighs a lot.  I settled on 7 pounds and figured I could definitely hold some of it for Christmas.....if it lasted that long. 

Here's the conclusion on the end product:
I'm in Torrone heaven.   I'm not going to lie, the honey should have been higher quality but I made the decision to experiment with a cheaper version so it has a stronger flavor....and it's darker.  Using higher quality honey will definitely make it taste milder but I'm not particularly opposed to using that honey bear honey again.   I also had to really fiddle around with pans as I was prepping the honey.  This was a goof on my part that was due to the fact that I had forgotten how candy 'swells' when it boils.  Those bubbles of sugar don't evaporate.  A cup of liquid can produce a 5 quart mass of bubbles.  As a result, I started and stopped the boiling process more often than necessary to keep moving the liquid to larger pans...what a mess that was.  This might have also contributed to a slightly darker taste and color since it took longer to reach the desired temperature.  In spite of that, this candy is doggone good.  It's hard...You need a sturdy knife and potentially a hammer to break it up.  I didn't go to the full 'hard crack' stage for candy making.  I was somewhere between soft crack and hard crack. 

I guessed on the quantities I used for the Vanilla, Lemon and Almond extracts because there wasn't any real guidance on this.  I didn't factor in that I was adding extracts to REALLY HOT nougat.  I think that contributes to diluting the flavor by burning it off quickly.  It was so subtle in the final candy that I tripled the amount when I wrote out the recipe in this blog to remind me to add more extract in the future.  The candy can handle more flavor...but it was still good with very subtle flavor.  Maybe more lemon will balance the darker honey....guessing.

I'm really proud of this torrone recipe.... because I don't have much candy making experience.  You don't have to fuss with bain maries and you can just watch a thermometer or a timer.  It's that easy.  Having the advantage of a KitchenAid, eliminated the need for a squad of kitchen helpers and avoided elbow and shoulder injuries.  When you can adapt a recipe with a modern tool...go for it!

Here's the adapted recipe....hope it works for you! 

Ingredients
2 lbs (4 cups sugar)
2 lbs (3 cups honey)
6.5 Tablespoons of egg white (this was 3 egg whites from 'large' eggs)
1 Tablespoon of vanilla extract
2 teaspoons of lemon or orange extract
1/4 teaspoon of almond extract
3 lbs (12 cups)   toasted almonds with skins (toast in oven until fragrant...10 minutes at 350)
Edible Rice paper or Edible Potato paper (you can easily find on Amazon)

  1. Prepare an 11x14 inch pan (I used a large roasting pan) by spraying it with a non-stick spray and then laying down a layer of parchment paper on the bottom and sides.  The non-stick spray will help hold it in place. Put a layer of edible potato or rice paper on top of this and cut some smaller pieces to line the sides.  You can overlap pieces and then snip off the excess later when you pull it out. The sides won't stay in place until you actually pour in the nougat and put in the side pieces as you spread it out to the edge but have them cut to size and ready to do this.
  2. Mix 1 cup sugar with  5 tablespoons of egg whites (hold back about 1.5 tablespoons to add later) in a automatic mixer with a whisk attachment on medium speed.  Continue mixing while you prepare honey mixture on the stove.
  3. Mix honey and the remaining cup of sugar in a pan.  Get a heavy bottomed soup pan ....a much bigger pan than you think you need.  I started with a small saucepan and had to clumsily pour this mixture into consecutively larger pans until it wouldn't threaten to boil over.  Here was the mess I ended up with so I wanted to pass it along to other unsuspecting newcomers to candy making.  Boiled honey and sugar expands considerably.   Lesson learned. 
     
  4. It's good to have a candy thermometer for this but I can also attest that once this stuff starts to boil (anywhere from 5-15 minutes depending on your stove and pan), it takes another 4 minutes of boiling to reach the 290 degree temp (which isn't a totally hard torrone but it has a nice bite between soft crack and hard crack candy stage).  You'll know when to start the 4 minute countdown on the  'boiling' because your mixture will start to expand with lots of frothy candy bubbles.  Once this rapid expansion boiling starts, it should take 4 minutes to get to 290 degrees.     I stirred it often before it boiled and frequently during the next 4 minute period (for no other reason than I felt like it).  

  5. I poured the honey mixture slowly and carefully into the egg white mixture with the whisk attachment so it didn't splatter.   Also add the extracts at this point.  Mix on med to med high speed for 35 minutes.  After 35 minutes, add the remaining egg white (about 1.5 tablespoons and mix for another 50 minutes.   I put a cold ice pack on the top of my mixer because I had been running it non-stop for a long time.  Not sure it helps but I felt better that I was pampering it.  The KitchenAid did power through everything and doesn't seem to mind hours of non-stop use.
     
  6. With about 10 minutes remaining of mixing time, I put my almonds in a 350 degree oven for the last 10 minutes so that they would finish roasting and still be hot when I mixed them into the nougat.  This is important because that nougat starts to set up fast after you take it off the stove so the hot nuts help to keep it from turning hard. 
  7. If your mixer bowl is extra large, you might be able to just mix the nuts into this bowl.  I had to pour the nougat mixture into another larger mixing bowl and then mix the nuts before putting it into the prepared pan. 
  8. Pour the mixture into the prepared pan.  It will be really thick.  Push down on the mixture to spread evenly in the pan....put those side pieces of wafer paper in place before you push the nougat to the edges.  That side paper prevents it from adhering to the parchment paper (which might be tough to get off and it's not edible).  Push on the top of the nougat pretty hard to get it even.  Put more potato or rice wafer paper on top and press down again until you get a decent seal on top.  Now it's the waiting game to harden.  
  9. Let the nougat set up for at least a few hours and then remove from the pan.  Discard any parchment paper but leave the edible papers in place. Cut the nougat into 2 inch wide strips.  This will take some persistent pushing with a knife...aided by a mallet if necessary.  The picture below shows the poundage produced.   It made about 14 bars that were 6 ounces each Unfortunately, the color of the picture below has some kind of beige thing going on.   It's a flaw in the photo (or, more likely, the photographer).  It's delicious and not too difficult to get the results if you want to make great candy gifts.  I wrapped each bar up in parchment paper and tied with butcher string.   I'm probably fooling myself into thinking that wrapping these up would put a barrier between me and Torrone.  I can untie a string pretty fast.  Make these candy gifts if you want to kill a few hours on a rainy day.  Your friends and family will love you for it.
Final footnote....as I was messing around with this recipe, my sister and I were on the phone.  She mentioned an Italian cookbook called 'La Cucina'.  It's even larger than my my Scuola di Cucina (different authors)....but it's in English!  I immediately ordered this 900 page encyclopedia of regional Italian favorites.  The claim on this book is that you should know how to cook.  There are no photos and the recipes probably leave out a few fundamentals (very similar to my experience in translating my beloved Scuola di Cucina).  However, it might help to have both of these books when I'm stuck on techniques.  The book arrived today and it has 2 versions of Torrone from two different regions. Both require stove top stirring for 2 hours.   While this manual method might preserve the longevity of my KitchenAid, I'm not sure I'm ready to stand over a hot stove for 2 hours.  Time will tell.  As my dad said, I have a Testa Dura (hard head) and want to prove that I can make it both ways! 

Last comment...to my cousin Al....I have 6 pounds of this stuff waiting for you...:) 

Buona Mangiata!

.


Monday, August 5, 2019

Torrone Tart

Torrone Tart
Nutty Fruity Torrone Tart!
Italian Torrone is a nougat candy made out of honey, sugar and egg whites that can be shrouded in either chocolate or delicate white wafer.  Usually there are nuts as well as a citrus flavor mixed into the nougat.  There's a soft chewy version and then there's another version that splinters into sweet little shards when you bite into it.
I'm a fan of the hard version but will take any version when I can get it.
Here's a picture of the confection below.   But this IS NOT what I'm making.  I'm making the tart shown above by translating a recipe from my Italian language recipe book.  The tart is not a candy confection but it has many similar ingredients and is appropriately named....'Torrone Tart'.   I'm hoping it will eliminate the need for me to attempt to make the candy version ever again. 
This is the candy version that is popular all over Italy
Before I get into the results of this recipe, I'll go on record that my brother Ralph and I are the only ones in our family who have actually tried to make Torrone.  Neither of us succeeded with our one or two attempts and we both swore off ever attempting to make it again.  It's not a cheap experiment when you factor in the cost of a lot of nuts and honey.  I've seen it made in Italy and it was a serious commitment of time to heat the honey/egg white mixture to a consistency that works.  There were cauldrons the size of small Italian cars that were tended by the candy makers for 11 hours....yes, 11 hours...to get the right temperature. This meant constant stirring over heat to bring it to the right temperature.  Watching it being made somehow gave me the stupid notion that it was something I could handle without an army of volunteers to stir and watch the pot.  You know what they say...."a watched pot never boils"....aint that the truth!  I really didn't have any intention of stirring for 11 hours but I found a few recipes that implied that the harder version could be accomplished within 90 minutes.  You know that other saying...."if it sounds too good to be true...it is".  I personally gave up after 90 minutes because the temperature just wouldn't budge.  I was hoping it might have just been a flaw in my thermometer but it wasn't.  I've read where some people 'accidentally' get a harder version when they wanted a softer version while the hard version eludes those of us who really really want it.
In spite of all this, the final product was still tasty but it was like free flowing lava that just didn't set up.  I gave up on my idea of wrapping up bars of candy to give to my friends at Christmas and resorted to making salted caramels...which are awesomely good but not exactly an Italian recipe.  I might still sneak those caramels into this blog somewhere because I like them so much.  Not to be wasteful, I put the tray of Torrone lava in the freezer and then cut it into pieces to be stored in a frozen state for frequent sweet tooth attacks.   I also churned it into ice-cream and snuck it into anything that seemed like it could handle extra nougat sweetness.  I declared victory when I was down to my final 1 inch piece that I shoved into my mouth.   Ultimately, I missed that lava stuff when it was gone....sigh. 

So, when I saw this 'Torrone Tart', it got my attention.  There is a  pastry that lines the springform pan.....like a lemony shortbread cookie.  The inside of the tart is filled with a creamy white meringue mixture that resembles what soft Torrone looks like after you cook it for 11 hours but before it hardens...oozy goodness.   After it's baked, there is a 1 inch hardened meringue top that covers a softer darker nougat fruity filling inside.

The taste test was pretty interesting.  My brother gave it a 10 out of 10.  He thought it tasted exactly like Torrone.  He used to actually import and sell Italian Torrone as part of his gourmet product website so I consider his opinion to be somewhat expert.  Having said that,  I personaly had a hard time really declaring it to be identical in taste but it was largely because of the texture (not my hard crackly Torrone).    It's something we decided will be an addition to the Christmas table.   One other thing to note is that this recipe, like others in the beast of a book I'm translating, suggested it would feed 4-6.  It will feed 12 at a minimum!   What you don't eat, you can easily freeze....yet another opportunity to savor something resembling Torrone for a longer period of time.    The recipe itself is pretty simple if you don't count the chopping time for the almonds, candied citrus and chocolate.  You can probably use any crust that you're comfortable using but I recommend that you sneak grated lemon rind into the pastry to heighten the Torrone experience. 

Before I share the recipe, I'm going to go on record as saying that this recipe was more confusing to translate than some of the others.  A few of the ingredients failed to make it into the instructions (small 'walnut sized' piece of butter and a 'little bit of' flour).  I used my best judgement and assumed that these ingredients were used to prep the pan before baking.  It also had a baking instruction that called for baking for 40 minutes and then 'leaving it to dry' but it doesn't instruct you as to whether you leave it in the oven or on the counter.  I split the difference and turned off the oven after 40 minutes, cracked the door for 2-3 minutes to let a lot of the heat escape and then closed it again and left the tart in the oven for about another hour.  I wouldn't change anything about this process since the texture of the tart was really perfect. 

I knew it was inevitable that I would get at least one of these recipes where the instructions were left to the imagination, Italian tradition or common sense vs. being well written down.   I guess that's one of the reasons I'm trying to experiment so that they can be written down with more accuracy..

Final conclusion, it really was a success as a good dessert that feeds a lot of people.  It was sweet and delicious.  A small piece is a great accompaniment to a cup of coffee.  I wouldn't declare it off limits as a morning sweet...... if you're that kinda person.  It tasted a little like a chocolate covered version of Torrone.....but, in the end it wasn't Torrone and only made me want to attempt to make that daggone honey candy again.  I just checked my freezer and there's enough room to store another failed attempt if required.  I might have to give it a shot so stay tuned.  I'm assuming that the author of the Italian recipe book might have recognized that most people don't have the talent or the time to make Torrone so she intentionally left it out.  That makes the challenge much more interesting!

Back to this recipe.....there are two parts...the short crust pastry and then the meringue cream filling.

Ingredients (for 6 servings....ha ha ha)

Short Pastry Dough for a 9 inch spring-form pan:

500 g  (3 1/4 cups plus 1 tablespoon) flour
220 g (1 cup) sugar
Pinch of salt (about 1/8-1/4 teaspoon)
200 g (14 1/2 tablespoons) butter
Grated rind of one lemon
145 g (3 large) eggs plus 2 tablespoons of ice cold water

Filling:
6 egg whites
300 g caster sugar (I'll share a tip on how to make this in the instructions below)
110 g chopped citron or candied citrus (recipe is in my blog for Sfogliatelle but you can buy citron)
110 g chopped dark chocolate (60-70% cocoa)
1 'Noce' of butter (this actually translates to 1 piece of butter the size of a walnut)
Little bit of flour (hmmmm...not sure what this means but assume a tablespoon)

Making the Pastry Dough:

  1. Mix together the flour, sugar and salt in a large pan or in a food processor. Add cold butter that has been cut into 1/2 inch pieces.   I opted to use a large metal pan to mix the ingredients so that I could take easier pictures of the process and because I actually like the texture of pastry dough when I can control the butter texture more easily.  A food processor is fine to use for this particular pastry because it's more like a shortbread cookie.  It's a very simple pastry recipe so use your best technique to incorporate butter and flour or just use another slightly sweet pastry if you have one you like.    
  2. I used a pastry cutter to mix the flour and butter.  You want to get it to where the mixture resembles a very course texture with some larger pea sized pieces of butter that are still obvious.
  3. Mix the eggs, lemon rind and water in a bowl with a fork
  4. If you are using a pan, create a well in your flour and pour in the egg mixture.  Start to incorporate with a spoon.  You will then need to get your hands involved and combine everything until most of the dry parts are incorporated and you can knead it a little.   If you use a food processor, add the egg mixture and pulse until the mixture barely comes together.  You don't want a tennis ball of dough running around in your food processor or you'll end up with a cardboard texture to your crust.  You really just want the mixture to be able to come together when you pour it all out on a pastry board and then knead it with your hands.  You'll want the final product of this step to look like the third picture below.  


  5. OK....here's a fancy word you can tuck into your conversation with gourmet friends....FRAISAGE.  This is the process of smearing the last bits of  butter  chunks that are left in the kneaded pastry so that it results in longer 'shards' of butter that help keep the pastry tender.   You just pull off a handful sized piece of the semi-kneaded dough and use the palm of your hand to 'smear' it on your counter.  You gather that up and do another piece and keep on adding each 'fraisaged' piece of dough to form a large clumpy ball of dough.  One good smear of the smaller pieces does it.  You don't want to overdo it....and it's really not entirely necessary to even do it with this dough but that's what the recipe called for so I did it.  I've used this technique for other more delicate pie crusts....bingo!!!  It's a great way to guarantee that your pie crust stays really flaky.  
  6. Once you've fraisaged all these pieces of dough and formed one ball of dough, cover it in plastic and let it rest in the fridge for at least 2 hours.  It's sort of fun to do this so it's easy to get the butter a little to soft....which is why the longer rest period is preferred.  You'll want the butter to harden back up in the fridge.  
  7. True confessions:  Ooops....I forgot to add the lemon rind to my eggs so I added it to the dough at the end and just incorporated during the 'fraisage.  It worked fine.   Cooking is about making mistakes and experimenting with solutions.  Like I said...this dough is very forgiving because it's more like a shortbread cookie than puff pastry or pie pastry.     
Making the Filling and Assembling the tart:
  1. Preheat the oven to 355 degrees.
  2. Butter and flour a 9 inch springform pan.
  3. Chop, chop chop and then mix together....the candied fruit or citron, the almonds and the chocolate


  4. Whip the egg whites with the caster sugar.  If you don't have caster sugar, it's pretty easy to make. I put about 1/2 cup of granulated sugar in a coffee grinder and grind for about 9-10 seconds.  You don't want to get to a consistency of powdered sugar.  It should still have the slightest texture of grains.  Some grinders might take a little longer.  I have a Krups and it works fast so after 9 seconds it was done.  Alternatively, you can use a blender if you're making more volume.  The egg whites, when mixed with the sugar and whipped will form very soft peaks like below:
  5. Add the nut, fruit, chocolate mixture to the egg whites using a spatula to blend.
  6. Remove the pastry from the refrigerator and roll it out to a 14-15 inch diameter that is about 1/4 inch thick.  It has to be be large enough to fit the bottom and sides of the pan.  Layer it in the pan and up the sides.  Trim the excess around the rim.


  7. Pour filling into tart crust and bake for 40 minutes.
  8. After 40 minutes, turn off the oven and open the oven door for 2 minutes to let the heat escape.  Leave the tart in the oven and then re-close the door.  Let it 'dry' for another 45-60 minutes before removing it.  If anything looks like it's overbrowning, just remove it earlier.  The tart should be lightly browned on top and look like a crisp meringue.  
  9. Cool completely and remove the sides of the spring-form pan
  10. Here's the decadent finished product.  It will feed 12!!!!
This recipe is really special.  The texture on the inside gets more firm after you refrigerate so it does resemble a soft torrone.   I've already frozen some of this tart because there were only 6 of us to enjoy it the other night.  I'm craving it right now and glad that it's frozen so that I'm not tempted. 

Buona Mangiata!

Tuesday, July 23, 2019

Ricotta-Will never ever buy it again!


When I was young, licking the beaters on the hand mixer or the empty bowl and spatula after a cake was safely in the oven was the reward for watching your mom prepare it.   Sometimes, with 4 siblings you had to be smarter or meaner to claim the prize.   I generally gave up on the challenge.  My youngest twin brothers were too 'cute' to push out of the way.   Don't get me wrong, occasionally they were morons and I felt no shame in being the bigger sister who could outreach or outsmart them.  I don't want them to be reading this and think I was a complete pushover.

Instead of cake batter leftovers, I found an even better alternative in ricotta cheese.   There was never a shortage of ricotta cheese in our house.  In fact, I'm not sure I even knew what cottage cheese was until I went to college.   I recall one afternoon when one of our non-Italian neighbors said that they prepared lasagna with cottage cheese.  There was an audible gasp from my mom, my aunt and other Italian ladies in the room.....pure sacrilege.    In our home, ricotta was always being mixed into some kind of pasta or pastry.  So, instead of cake batters, I developed an even fonder affection for the remnants of the ricotta cheese mixtures that weren't yet appreciated by the youngest in our family.   It didn't matter if it was savory vs. sweet.  If it had ricotta in it, it had to be good.

I was only familiar with the version of ricotta cheese that my mom used at that time....which came in the plastic containers from the local Giant Food Store.  At that time, I'm not sure that the plastic container versions had all of the stabilizers and gum additives...probably not.  From my humble perspective, it was good and it was the only version I knew.

The first time I experienced fresh ricotta rocked my world.  We were visiting our Italian neighbor's mom somewhere outside NYC.   She was at least 80 years old and could only speak a few words of English.   I was 16 and the trip included a whirlwind first visit to NYC and LITTLE ITALY (I'll definitely save this one for another blog because Mulberry Street at that time was like a trip to Naples!!!)

Every morning this wonderful lady would toast her homemade Italian bread and put a jar of creamy homemade ricotta cheese on the table in lieu of butter.   This was just a teaser to hold you over until the rest of the household got out of bed and assembled at the table.  Bread and cheese was ultimately followed by fritattas and salamis and pastries from the local Italian market.  However, I was content with the ricotta cheese and bread and would wake up earlier each day to make sure that I could sit with this wonderful lady for longer periods of time to watch her do her thing as she prepped breakfast while I consumed a half loaf of bread with cheese. 

Everyone on that trip spoke Italian except me.  If I was the first one up in the morning to greet our host, the communication was scant if you counted the number of words exchanged.  But, the big expressions and gestures we exchanged were otherwise abundant.  We communicated like this every day.  At some point in time on that trip, I'm pretty sure I could understand everything she was saying to me.  I guess 10 Italian staccato words that ended in 'mangia' made it pretty easy to assume she was telling me what she had made as she pushed it in my direction to eat. 

On our last morning with her, she put a harder piece of cheese on the table.  It was sweet, tangy and salty.  I found out it was the hard version of ricotta.  I was in love with this lady.  I could have moved in and been a really happy fat teenager if she would let me.  I put a slice of that cheese on a piece of her crunchy, thick crusted bread and then she pushed her homemade lemon marmalade in my direction.  Her eyes never left my face while I ate with the appetite of an athlete.  I knew that she knew that I was a kindred spirit.   That trip opened my eyes to the reality that I would be going home to a lesser form of ricotta cheese.  It was heartbreaking.

On future trips to Italy or NYC, I would seek out and gorge on ricotta whenever I got the chance.  Grocery store versions in the plastic containers were something I started to tolerate.  It was hard to avoid the ones made with carrageenan.  Googling carrageenan only confirmed why I hate ricotta made with it:
  • Carrageenans are a family of linear sulfated polysaccharides that are extracted from red edible seaweeds. They are widely used in the food industry, for their gelling, thickening, and stabilizing properties.  Some evidence exists that carrageenan triggers inflammation, gastrointestinal ulcerations, and that it damages your digestive system.
It wasn't until recently that I realized that there is another option.  I can make it myself. I thought it involved complex cheesemaking skills...but it doesn't.

My brother, Mike, and I made homemade mozzarella a few years ago.  The end result was a small ball of mozzarella but the kitchen reflected hard evidence that we had made it ourselves.   There were piles of dirty pans, colanders, spilled and burnt milk on the stove.  Gallons of milk went into this experiment but when it was all done, there was less than 16 ounces of fresh mozzarella.  The cheese curd separates from the milk, you are left with lots of watery whey and smaller curds.  We weren't aware that if you save this watery residue, you could make ricotta.  It went down the drain.

I wanted to avoid the need to get to the whey product created by making mozzarella (which will be an experiment in another blog) in order to make fresh ricotta.  There's a simple process to get a fairly good replica of authentic ricotta cheese.  This less authentic version is really really good and far outweighs anything you can get from the big brand plastic container versions.  It involves heating milk.  Do not use Ultra Pasteurized milk!!  There's an unnecessary chemistry conversation that I will avoid but trust me that it will not yield the results you want.  Once heated to a temp of about 185 degrees, you add an acid (preferably distilled white vinegar but you can use lemon juice if you want a lemony flavor).  You stir it once and curds form.  You then leave it alone.  This is hard but you really just leave it untouched for 20 minutes while you monitor the heat to keep it within 10 degrees in either direction.  This 20 minutes gives the flavor to your ricotta.  If you scoop it earlier, it tastes like cooked milk.   If the temp hovers too long in the 165 degree range, you'll get less volume.  If it hovers in the 195 degree range, you get a drier grainier version.  Aim for 185 degrees for 20 minutes and the fiddling with the pan will occupy your time while you wait.  I hovered over the thermometer like it was the countdown on a nuclear warhead.  I lifted the pan off the heat and put it back to keep the temp pretty perfect. At the 20 minute mark, you gently scoop out the curds with a slotted spoon and drain for about 10-20 minutes depending on the texture and creaminess you want.  It's so easy, it's literally fullproof...so here come the fat pants!

Ingredients:
8 cups of whole milk (do not use ultra pasteurized!)
2 tablespoons plus 2 teaspoons of distilled white vinegar


  1. Pour milk into pan and heat to 185 degrees
  2. Add vinegar when the temp reaches 185 degrees.  Stir it until you see the curds start to emerge.  Hide your spoon and don't stir it again.
  3. Hold the curds for 20 minutes at 185 degree. Move the pan on and off the burner to keep the temp as close to 185 as possible.  At the end of 20 minutes, gently move the curds from the pan to a cheesecloth lined strainer using a slotted spoon.  Let most of the liquid strain back into the pan.

  4. Let the ricotta curds drain for about just a few minutes depending on how creamy you want your final ricotta.  Note the weight scale below.  You'll get about 14-16 ounces of ricotta from 8 cups of milk.  That's about 2 cups. 
  5. Lastly, put that watery residue back into the milk container and freeze it for using in soups, rice dishes, etc.  It's a slightly sweet milky flavor....really nice alternative for chicken stock.


That's it!!!!  I was lazy today so no big Italian cooking experiment going.  Instead, I wanted to blog about how to make ricotta because for such a simple recipe, it's killer.  I've recently worked on a few complicated things that required ricotta so wanted to share the success I had in making it.   It will not disappoint.  Your lasagna, raviolis and pastries will thank you!

Buona Mangiata!


Thursday, July 18, 2019

Sfogliatelle-Italian Crack!

Sfogliatelle- Italian crack!
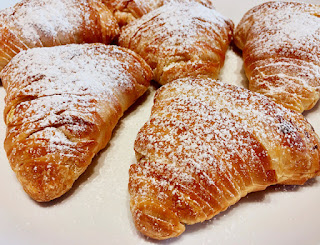
And they tasted even better!

It makes me sad that the literal translation (according to Google) of sfogliatelle is 'puffs'.  This has you imagining something simple, ordinary, run of the mill.  These pastries are ANYTHING BUT ORDINARY.  They are elegant artisan creations and I'm just desperate enough to eat them to try to make them!  These were my dad's favorites and also his brother's, my Uncle Luke.   Heck, I'm pretty sure they were everyone's favorites for that matter.

Sfogliatelle originated in Naples.  They were pastries originally made for the nobles and aristocrats.  Fortunately, peasant families, like mine, came to adore them as well.

An Italian will tell you that the more literal translation of sfogliatelle is 'layers of leaves'.  This is a more worthy translation so I feel a little better.  Harder than the translation is having someone pronounce it correctly the first time.  Just leave the 'G' silent and you are pretty much there...sfol-e-a-tel-e.  Our family's pronunciation went off the grid a little....sfol-ya-del.  As you go further south in Italy, I think the regional dialects get a little more efficient in not pronouncing every vowel in the interest of just getting to the pastry faster.

We couldn't get great Italian pastries in Washington DC very easily when I was growing up.  For this kind of indulgence, it was necessary to pack up the car and head to Connecticut.  There were closer options in New Jersey and New York but we didn't have relatives in those states so what would be the point of that?  Sfogliatelle were meant to be enjoyed with family!

There were lots of great reasons to visit our huggy, kissy, aunts, uncles and cousins.  We only got to see them a few times a year.  Sfogliatelle was just one of the many things that made the 9 hour trip worthwhile.   Almost every single night, relatives would gather for dessert.  Most of the time, these desserts would be purchased from the old world Italian bakery.  With the culinary skill of my aunts, I often wondered why they didn't just whip these up in their spare time....I was such a foolish child.  Sfogliatelle requires quite a bit of prep, skill and patience.  There aren't really any shortcuts on this one....as you'll see.  When Italian neighborhoods had an abundance of bakeries, the sfogliatelle could be purchased for reasonable prices and made it worthwhile for the aunts not to spend hours in the kitchen slaving over the pastry dough.   Eventually, as the number of Italian bakeries shrunk, the price for these little gems skyrocketed.  You'll now pay through the nose to enjoy them.  Just to bring home the point.....Ferrara's bakery in Little Italy sells them for $52 a dozen with another $40 in shipping cost!  I'm all about authenticity but I'm not willing to pay that price.  New Yorkers can pick them up directly without the shipping surcharge and pay about $5 each for the pleasure....but the rest of us might want a different alternative.

Let me focus on the sfogliatelle themselves and the vivid memories I have of waiting for those platters of sweets to be danced out of the kitchen by the aunts.  Most kids get that stern look from their parents when they are presented with choices for desserts.  The look is followed by...."You can only  have one!".   We heard it from our parents and, sadly, we passed it on to the next generation when we became parents. Those words still ring in my ears (and for any of my nieces reading this, I will be whispering in the ear of your child..."take as many as you want" ).

There are familiar Italian pastries like cannoli, biscotti, pannetone.  They are good options when others don't exist. But, sfogiatelle is in a class all its own.  So, when that platter of pastries came out of the kitchen, accompanied by my mom's stern look, it didn't take me more than a second to swoop in on the sfogliatelle before other eager hands snapped them up.  It was a mournful night when there weren't enough to go around for the adults and the kids.  Italian kids generally get spoiled by aunts and uncles so when there was a question as to whether Uncle Frankie or little 5 year old Ralph (with his big soulful eyes) would get that pastry, it wasn't a contest.  Uncle Frankie's wife, Aunt Marge, would turn her stern eyes to Frankie and his hand would detour to the biscotti as a reluctant second choice. Over time, the selection of pastries swung to a heavy ratio of sfogliatelle to make sure no one was ever disappointed.

Let's dissect the goodness of this particular pastry.  The recipe that follows will show step by step directions but there is something beyond the ingredients that make these pastries so compelling.

We all know the pleasure that goes into eating Oreo cookies.  There are generally two ways to eat them.  You can dunk in milk and devour them quickly or you can pull them apart, scrape that sweet Crisco off the chocolate wafer with your teeth and then eat each chocolate wafer separately.  I'm pretty sure the dismembering of the Oreo was to savor the experience.   The dunkers went for volume but if a mom had anything to say about it, you were probably limited in the number of cookies you could eat at one sitting, like I was.  We might get 3 in our lunch box.  This meant you'd take that slow route and pull them apart.

Sfogliatelle are an interesting equivalent to an Oreo....but make no mistake, they are world's apart in terms of sweet indulgences.  Imagine a ribbon of crackly pastry wrapped in dozens of layers around a filling of sweet ricotta cream...shaped like a clam shell.   The ribbon is better than any other pastry dough....so much better.  It literally cracks when you bite into it.  After studying dozens of recipes, reviews and youtubes,  I now realize that it's about the right flour (bread flour)...and the glorious fat that separates the layers of dough.  Don't substitute anything or you'll forfeit that crispy, crackly pastry ribbon.   Also, don't cringe when I say this, but each layer of the ribbon is separated by a layer of 'lard'....not butter....sigh.    Lard has a bad rap.  It's pork fat...so you just have to get over it unless you are a vegetarian.   Oreos have Crisco....and probably additives to that Crisco so I'll take lard over Crisco on any day.  Although lots of recipes use butter, we're all about authenticity so LARD it is. 

Anyway, I've deviated from why sfogliatelle  are like Oreos.  With a history of savoring my sweet indulgences, I would unravel that crispy ribbon shell and enjoy each sweet crunchy bite slowly.   It could take me quite a while if I put my mind to it.  By the time I would get to the final layer encasing that rich ricotta cream, I would be ready to bite into it and get an explosion of citrus flavored cream with one final crunch of the pastry.  This is a finale worth waiting for.  Of course, you don't have to eat them this way.  Uncle Frankie would devour the whole thing in 3 bites.  The first bite would take 1/3 of the crunchy pastry with a healthy dose of cream.  If the cream was oozy, you had to swoop in for the second bite before you got the first chew completed..and then that third one to finish it off.   Wham....gone!   As an adult, he was allowed more than one pastry so the time spent with each one was of little value to him.  His method proved to be messier.  Having said that, the experience of 3 rapid big bites of crunch and cream did have its appeal.  Moments like those reinforced my firm belief that being an adult came with the advantage of unlimited access to pastries without mom eyeballing your every move.   Weight maintenance wasn't part of what I played out in my head when I was 8.  That unfortunate reality would hit me around the age of 35.  Consequently, as an adult, I still hear those dreaded words in my head...."you can only have one".

I'm dedicating this particular recipe effort to my brother Mike.  He had the advantage of living in New Jersey for a few years and spoiled himself with sfogliatelle.  He now lives in Indianapolis.....so all good things came to an end in terms of access to Italian pastry.  He's challenged me to make him sfogliatelle.  This recipe isn't in my all cosmic Italian recipe book that I'm painstakingly translating.  Instead, I'm plowing though other resources.  I've moved from translating written recipes into trying to catch a few Italian words and phrases in scattered youtubes and then translating these while guessing at most of the words as I misspell them in Google translator.  The amalgamated recipe that I have come up with seems to capture the essence of authenticity.   Where most English versions of recipes are satisfied with using all purpose flour and butter, the chefs from Naples use bread flour (specifically Caputo Manitoba flour but I will use Gold Medal bread flour).  You could just grate citrus peel into the ricotta filling but the authentic filling is made with home-made candied citrus peel and then a little bit of grated peel as well.  And let's not forget the lard.....it is a transformative fat in how it reacts with these layers of dough.  The only thing I'm still toying with is whether or not I should make homemade ricotta.  That might be too much to tackle over a two day test kitchen event.  In spite of being intimidated by this particular challenge, I'm anxious to get started to see if this recipe will successfully satisfy a sweet tooth aching to test the result. 

This has a lot of steps so be patient!

I have no doubt that I will need to do these several times.  It's unlikely that you hit pay dirt on the first try with these goodies.  I'll continue to update this blog until I think I have it perfected over time.

However, here is the conclusion after my first attempt:

Made my own candied citrus peel.  This was easy and is included in the recipe below.  I almost feel healthy eating it but, like most splendiferous things, that's just an illusion.  I'm wondering why I would ever throw another citrus peel away when I can make these tasty treats so easily. 

Did I make homemade ricotta....YES!  Recipe will be in a separate blog.  There's a quick way and a slower way to make Ricotta.  The version I chose is the slower method because it theoretically develops a more authentic ricotta flavor.  Real ricotta is made from the whey that comes from making cheese.  In the absence of having that handy, this alternative creates a really wonderful version of ricotta that is 10 times better than grainy brands at most grocery stores....and much cheaper.   I'll probably experiment on the different ways to make ricotta for another post opportunity but for now, it took about 30 minutes (and most of that was just sitting and watching the curds and whey go their separate 'wheys'....couldn't resist the opportunity for a pun!).  It was well worth it.  My one mistake is that I probably drained it for too long and it got firmer than needed.  I'd like a creamier ricotta filling for these pastries  The taste, however, was head and shoulders above anything from the stores in this part of the country.

Sfogliatelle prep and execution.  Wow, this was fun.   I didn't expect to say that.  I thought I would be using all those delicious Italian curse words throughout the process (which is why I haven't attempted to video anything).  There are lots of tricks that I learned and will use more efficiently on the next attempt but here are the essential ones:

  • You can use the KitchenAid automatic pasta maker....but a manual pasta machine has one more extra thin setting.  Yes, I own two machines.  Having two comes in handy every once in a while.  So, I sped up the process by using the KitchenAid through to the thinnest setting and then transferred the dough over to the manual machine for the final roll. It might not be entirely necessary to do this but the dough was transparently thin and perfect as I stretched it into a roll (you'll see what I mean in the photos).   You can probably get the same result by just stretching the dough a little more. 
  • Rolling the dough into a log after you've rolled out the thinnest setting is tricky because you need room to unroll an 8-10 foot length of dough.  I didn't plan ahead, violating my one rule about really preparing for the recipe before you launch into it...curses to me.   I put the pasta machine in the wrong place, with too little yardage for the ever expanding length of dough, so I improvised.  I followed one instruction that suggested rolling the entire length of dough around a rolling pin and then unrolling it before slathering the surface with lard and re-rolling it again into a log.   That failed miserably.  The dough stuck together and shredded as I tried to unroll it.  I cut it off the rolling pin and proceeded to start all over again through the pasta machine.  The rolling pin thing MIGHT work if you stop with the thickness of the KitchenAid and don't use a thinner setting on a manual machine.  I think the super thin layers are just too fragile.  With my final roll of the dough out of the KitchenAid, it was a dilemma but I decided to try to stay true to the thinnest version of dough and cranked out the final thin layer from the manual pasta machine.  As it came out of the manual machine, I would stop cranking and lather up the sheet that had been extruded.  I stretched it to twice its width and then rolled it into the jelly roll.  This worked perfectly and I'll go through the technique in detail in the recipe....yippee!
  • Forming the clam shell shape is an art.  I figured it out after fumbling through 12 of them.  I was a pro by the time I got to the final few.  You'll start with a 2 inch round disc.  If you spread a little lard on the top and bottom of the disk, it helps the fingers slide instead of pulling the dough.   Use your thumbs on the top and index fingers underneath to gently flatten, turn and push from the center of the disk with your thumbs to the outer edges, you'll actually feel those layers start to emerge on the disk....like little baby ridges.   You have to make sure you go from the center to the outer edge until you reach a point of no return.  You'll know this 'point of no return' after you poke a few holes in the first few you attempt.  You then move your thumbs and finger pressure more towards the middle and the up towards the outer edge.  Use an even pressure and movement as you rotate the disc.  In the end, all of those ribbons or leaves of dough will be exposed by just a fraction of themselves on a flat like disc....looks a little like an old vinyl record with the grooves and ridges.  It will double in size and then this disc will start to invert itself into a cone.  I confess to making a bunch of these with holes that formed where the ribbons separated because I pushed unevenly.  No matter.....they might have looked a little uglier but they tasted great.  
  • I froze some of the final product without baking....and put the rest in the fridge to make for dessert last night.  I took them out of the fridge about an hour before baking to let them come to room temp.  They cooked up crackly, crispy...PERFECT!  

And here's the recipe!
 

Candied Citrus Peel 
(I'm putting this at the front of the recipe because when you finally get the urge to make the sfogliatelle, you don't want to have to get frustrated waiting for the candied citrus peel to dry for 2 days...god forbid you loose the urge to make the sfogliatelle)

Ingredients

  • 3 oranges
  • 1 lemon
  • 2 cups water and 1 cup sugar to boil into a syrup
  • 1/4 cup sugar to coat (less or more to taste)

  1. Cut the ends off of 3 oranges and 2 lemons 
  2. Slice into the peel from top to bottom of each piece of citrus to make it easier to peel
  3. Peel each section and then gently scrape some of the white pith from each peel.  You don't need to be compulsive about this.  I've also just cut the peel off the fruit to minimize the amount of white pith that comes with it.  If you decide to cut off the peel, just make sure you don't include any of the pulp.  Definitely remove this before the next step. 
  4. Cut each peel into 1/4 inch slices
  5. Put the peel in a pan, cover with water and boil for about 15 minutes.   Drain into a colander and rinse.  Put them back into the pan and cover with cold water to drain and rinse one more time.  This will remove some of the bitter taste from the peel.
      
  6. Put 2 cups of sugar and 1 cup of water in a pan.  Bring to a boil and stir to dissolve the sugar.  Add the peel and reduce heat to a simmer for 45 minutes or until the peel is translucent.  The amount of time it takes to get to that 'translucent' stage can vary depending on the thickness of the pith, the temperature of your simmer, etc.  Just watch it and when it gets to a nice translucent level.....time to take it out.
     
  7. Use a slotted spoon or a pair of tongs to remove the peel just letting the excess syrup drip off for a few seconds.  Then, toss all of the peel into a bowl at once with about 1/8-1/4 cup of granulated sugar and stir to coat each piece.   The amount of sugar you use at this point is really up to you.  I don't like the peel overly saturated with sugar.  It's been boiling in syrup for 45 minutes so there's no chance that it won't be sweet.  If you have caster sugar (fine granules), use that but ordinary granulated sugar is fine too.
      
  8. Place the peel on a rack to dry for 24-48 hours.   Alternatively, just throw it on a plate and toss it around every few hours or whenever you think of it until it's all dried.  
  9. SAVE THE SYRUP....this is a great simple syrup for cocktails, ice tea, etc.  
  10. Candied peel can be stored in a sealed container or zip lock bag for at least one month, refrigerated for several months or frozen for even longer.   I need to freeze it.  Out of sight out of mind.  Right now, I'm craving some of that frozen orange peel so I'll take a break and go munch on some. 
Pastry Dough
Ingredients:
  • 500 grams bread flour (3.9 cups)
  • 1/4 teaspoon salt
  • 190 grams water (7/8th cup)
  • 40 grams honey (1.5 to 2 Tbs)
Preparing the dough and pastry shells:
  1. Mix the four ingredients above in a bowl.  Use a spoon until it gets too hard and then dive in with your hands!
  2. Knead the dough for 10 full minutes.  It seems like a long time and your arms and hands will hate you but just do it and it will pay off.  You'll see the dough transform from a lumpy mess to a smooth ball.  

  3. Wrap the dough in plastic and set it aside for 30 minutes.  Don't refrigerate it.  It's resting...shhhhhh. 
  4. Divide the dough into 2 pieces.  take one of the pieces and keep the other one wrapped in plastic wrap.  Flatten it a little and pass it through the first level of thickness on your pasta machine.  As I mentioned I have both the electic KitchenAid and a manual one.  I used the KitchenAid to do the heavy work because it's faster and easier.....and then made the final pass of the dough in the manual machine as you'll see in step #5.  
    Here's the hardly used manual machine that came in handy


  5. You'll put your dough through the first level of the KitchenAid to start to consolidate it and get it to an elastic piece of dough.  You fold it in three when it comes out and turn it clockwise and pass it through again.  You do this another 10-15 times at level 1.  You'll feel the texture getting springy.  I then took it up a notch to the level 2 and only ran it through the machine once or twice without folding it.  Again, without folding, I ran it through levels 3-8.  It's getting pretty long at this point but the texture is nice and pliable.  I forgot to take pictures of this but it's basic pasta dough making for anyone who has done this before.  The good news is that this is not like pie crust.  It's very elastic and easy to work with and doesn't make a mess out of anything...including the machines.
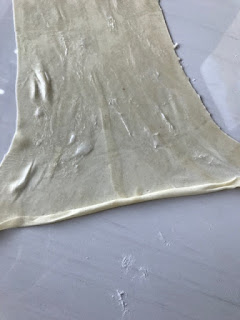
  6. Moving on to the manual machine.  You might not need to go to this extreme level of thinness because you will be stretching the dough as you roll it.  In the first picture below, I'm feeding this really long piece of pastry dough into the manual crank machine.  It's folding itself under the machine.  In the second photo, I've pulled out the folded layers to prevent them from sticking to each other and laid it on the counter.  It was about 3 feet long at this point.  I still had another 3 feet left to feed through the machine.  

  7. The process of slathering on the lard, stretching the dough and rolling it into a log is shown in the following pictures.  You can see in the first photo below, I'm just beginning to roll the dough into a log.  This first step is essential to get it tight.  Don't put lard on the first few inches.  It will prevent them from sliding apart when you are making the discs and keep the ends pretty.  The dough has to be stretched to twice the width as you start to roll.  In the second photo,  the dough extruded from the pasta machine is just laying on the kitchen counter.  I smear it with lard, making sure to get the edges.  Lard was all over the counter but that actually made it easier to stretch the dough in the third picture below (...and that's why God made Windex to clean your counters).  You'll keep stretching it to about double the width.  You can see that this dough has the elasticity of a balloon.  It's really transparent as you stretch it.  You then lay it on the counter and it stays put because of the residual lard on the counter.   You roll up the dough onto the log and keep cranking out the dough, lathering it up, stretching and rolling until you use up the dough.  When you finish with the first batch of dough, smear the log all over with lard and wrap loosely in plastic to keep it from drying out until you finish rolling out the remainder of the dough that hasn't gone through the rolling process.   Overlap the end pieces about an inch to join them together and keep rolling your log.  


  8. Give you log one final smear of lard, wrap it in plastic and put it in the refrigerator overnight...or at least 10 hours to make sure the lard re-hardens.
  9. Take the log out of the refrigerator and start to squeeze, stretch and roll it until it's about 2-3 times in length or about 2 inches in diameter.

  10.   Slice the log into 3/4 inch discs.  You'll be able to see all those lovely layers of dough when you look at the flat side of the disc

  11. Start to flatten the disc using your thumbs and index finger.  Thumbs on top, index fingers underneath.  Push from the center out to the edges as you rotate the disc...doubling the diameter of the disc.  Just work it from the center until the center is pretty thin but not separated.  Move up the disc with your fingers trying to make the disc an even thinness.  


  12. You'll get to a point where the disc will flatten out and then easily invert into a cone shape.  You'll cup the cone between your thumb and your other fingers and fill it with the ricotta filling (about two tablespoons)....(recipe follows).

      
  13. Close the clamshell and you're ready to bake in a 400 degree oven for 25 minutes or until nicely browned on top.   Look at all those ribbons of dough that you can see on the surface of the unbaked sfogliatelle...and that sheen of pure lard....all going to crisp up to something that crackles and crunches when you bite into it.  When they come out of the oven, sprinkle with confectioner's sugar and devour them!

Ricotta Cream Filling
(Full disclosure- I am not yet 100% satisfied with the cream.  The taste is awesome but the texture was a little stiffer than I wanted.  This was probably due to being overly zealous about making my own ricotta and then letting it drain too long.  This created a dryer, but wonderfully tasty, ricotta.  I'll be making a creamier texture next time.  Still, I loved the flavor and will keep most of the ingredients the same)

Ingredients:
150 grams (1 cup) of fine Semolina flour (Bob's Red Mill)
300 grams (2 cups) Ricotta
165 grams (3/4 cup) sugar
3 egg yolks
75 grams of finally chopped candied citrus peel
1/4 teaspoon cinnamon
340 grams (1.5 cups) whole milk
1.5 teaspoon vanilla
1 teaspoon grated orange peel
1/4 teaspoon sea salt

  1. Bring the milk to a simmer in a small pan.  Pour the semolina into the milk as  you stir it quickly.  Continue cooking for 2 minutes until it's very thick.  Scrape into a mixer bowl and start to mix it to cool it down a little. 
  2. Add vanilla and eggs when mixture is cooled.  Mix until well blended, scraping the side of the bowl often
  3. Add remainder of the ingredients and mix it up well.  That's it!  It's a very dense consistency and holds up really well when baked.  It doesn't ooze out of the pastry at all...which is what you want.  No single calorie should be wasted by burning on a baking sheet!

These little pastry bombs were perfect.  I really could stop here and declare 100% success but, like I said, I might try for a creamier innard.   When my brother posted the picture of the final result on his Facebook page last night, our foody family relatives hailed from far and wide to comment.  If any of them are reading this, I commit to making big quantities for a Connecticut reunion if we can pull it off!!   Our dearly loved aunts, uncles and parents, who have passed away, likely lent a helping hand in this effort. I hope I did them all proud.  

Buona Mangiata!